
The web sites on the internet are built using HTML, therefore understanding how they function is essential. You will learn the fundamentals of HTML in this course, enabling you to create and publish attractive websites. Regardless of your level of expertise, this course will teach you everything you need to know about HTML templates. Only a fundamental comprehension of ideas is required to learn HTML. We’ll start with a simple instruction manual to aid you in your learning journey by outlining some of the fundamental concepts you need to be familiar with before beginning to learn HTML.
What is HTML?
HTML stands for hypertext markup language and it is basically just a language that we can use to create web pages. So, if you have ever been on the internet, almost every single page on the internet was written in the language called HTML.
Here, you can set a number of HTML tags that will determine your website’s layout and overall aesthetic. You may therefore create your own website if you know what those HTML tags are, where to put them, and how to utilise them in combination. Building a bespoke website is much simpler than most people realise. It might be enjoyable at times to just go in, get your hands dirty, and begin creating a website from the ground up. Just be patient to the very end. To alter a webpage and make it what you want it to be, you will create HTML and discover new tags.
Choosing a Text Editor
Now whatever you are writing html, you are actually writing it inside of what is called an html file with extension .HTML instead of .txt or .cx extension.So, with HTML you are basically writing these html files and then your web browser can take those files and display them as web pages.
The first step is choosing a programme that you can use to create these HTML files. There are numerous solutions available. Due of the huge variations alone, it can seem a little intimidating. Really, all you need is a basic text editor that can edit files and save them in various formats to get the job done.
In most cases, a word processing programme is not necessary for writing HTML. The easier and better text editor for running HTML that is frequently suggested for novices is notepad. If you prefer not to utilise programmes like notepad or TextEdit, however, you can use custom created software. There is gathering.
- Atom
- Sublime
- Brackets
- WebStorm
But For beginners, the less complicated things are the better.
Creating an HTML file
The basic structure of a HTML document is straight over here.
<html>
<head>
<title><title/>
</head>
<body>
<p></p>
</body>
</html>
I want to talk to you about using certain fundamental HTML tags in this article. We will now examine some of the most popular tags that you will deploy on your website. The structure and design of a webpage are determined by its tags or elements.
- Tags: Tags are nothing, but a text written in angular brackets. Here you are going to see example of the body tag.
Example: <Body>
- Normally, HTML tags consist of an opening and a closing tag, like so<p> and </p>.
To close that tag, you will put a slash in front of the name of the tag. Here we are denoting that it is a paragraph tag.These ubiquitous tags can be found in nearly all HTML documents.
Every HTML page starts with this element, or doctype. It informs the browser what version to use and to anticipate HTML. The element should resemble the following for the most recent HTML version:
Elements in HTML document
- HTML: All page content must be contained in the tags after the doctype. <HTML>, </HTML>
- head: The page title and metadata are contained in this element. So, the head is sort of like the setting of the HTML file. <head>, </head>
- Body: All of the visible material on a page is contained in the body element. <body>, </body>
- Title: The name of your page appears in this optional component. It is always in the head tag. <title>, </title>
- Div: One of the most popular tags is this one. It is utilised to build a fundamental container for additional HTML or content.
- p: A sentence or part
- There are exceptions; There are some tags what we called them as void tags just because they do not have any content inside of them. So syntactically, there is no reason for them to close because there are no contents to put inside them.
A very good example of that would be an image tag. <img src=”myimage.jpg”>
Attributes
When we provide additional information regarding any element, we call that information as attribute. We can provide attributes for all the elements. Attributes are always provided in the start tag and mostly occur mostly in pairs and are of the form name= “value” which means name of the element and its respective value.
Example: <img src=”mydog.jpg” alt=”A photo of my dog.”>
The image source (src) and the alt text (alt) are attributes of the <img> tag.
We will use them to define pretty good-looking website.The first tag I want to show you is a tag that actually is going to go up here in the head of us document and I’mgoing to put it title. One thing that I want to do is define something called a Meta tag. Meta tag is basically a tag that defines information about our file.
<html>
<head>
<meta charset="UTF-8">
<title>your website</title>
</head>
<body>
<h1>Hello universe</h1>
<p>This is my Paragraph</p>
</body>
</html>
How to reflect your HTML coding to browser?
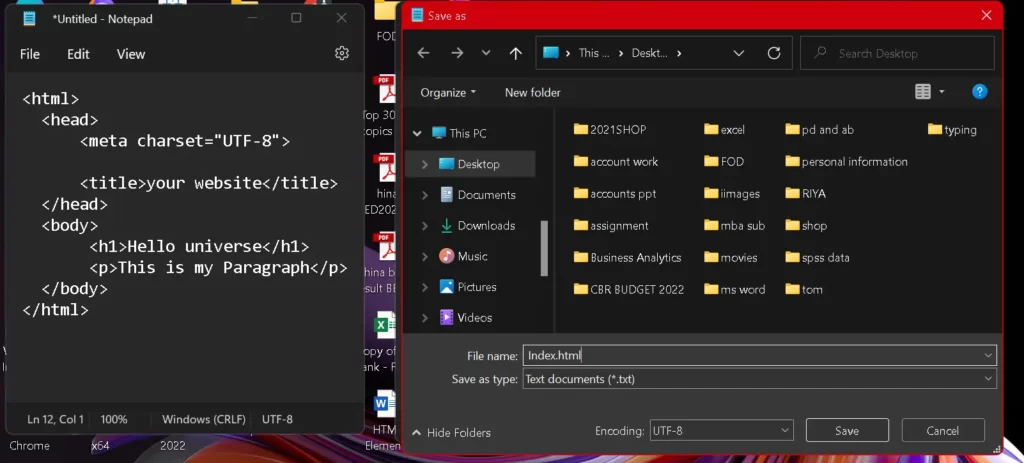
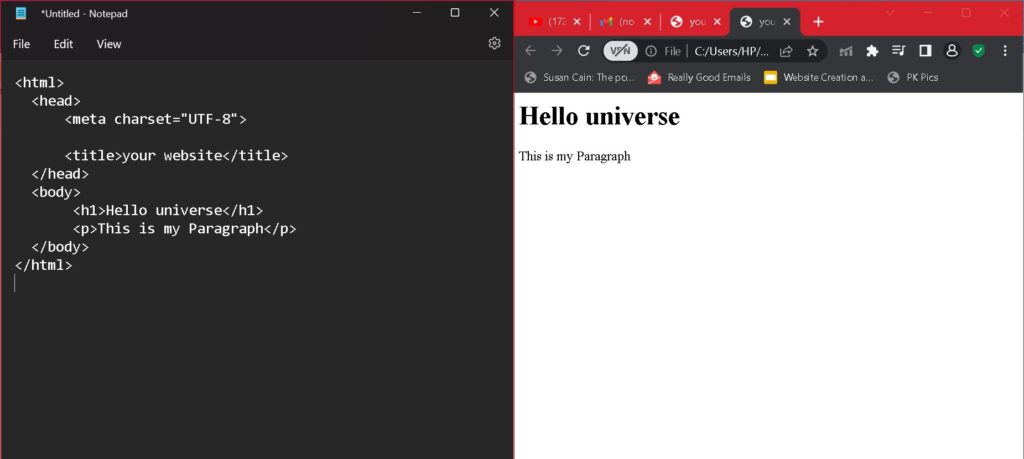
- Firstly, you must do is, save your documents with .html extension.
- Open you file to have a look on result.
Text style editing in HTML
Let’s look at the basics of creating text content on a web page. Now WebPages are like essays or even a newspaper where they have heading and usually paragraphs of texts. So here we see our paragraph element and h1 heading
<! Doctype html>
<Title>your website</title>
<Head>
</head>
<Body>
<h1>Hello universe</h1>
<p>this is my Paragraph</p>
</body>
</html>
Much of the text content on a web page will be made up of headings and paragraphs. Now headings have a hierarchy and that means we’ll start out with only one h1 on the page and each page should only have one h1 but after that we can have sub topics.
Here I am going to press shift+ Alt+ Down arrow. I have just copied a line down so now I have 2 H1s, but I am going to change this by typing h2 over that h1. Just notice how the ending tags immediately changed here in visual studio code as well. So that’s helpful. Now this is the subtopic of the page, so imagine this being the title of your essay. With h2 you can write something different. Now you can repeat the steps to add more subtopic under subtopic.
<! DOCTYPE html>
<Title>Your website</title>
<Head>
</head>
<Body>
<h1>Hello universe</h1>
<p>This is my Paragraph</p>
<h2>Let's begin</h2>
<p>This is my new Paragraph</p>
<h3>Hello guyz</h3>
<p>this is next one</p>
</body>
</html>
Really what I am showing is this hierarchy and it’s also important not just visually. Let me go ahead and save this by pressing ctrl + S or you can go to the file menu and choose save. Observe that it’s naturally formatted larger on the page with the h1. Also see pattern that h2 is smaller than h1 and so the h3 will be.
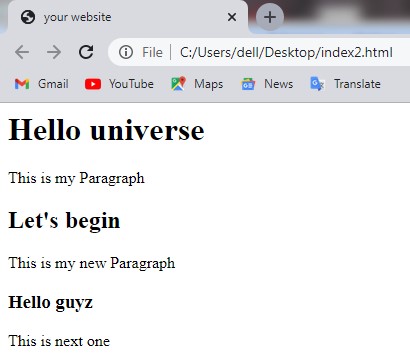
Here what is important that we can quickly visually tells the headers apart right now. When a screen reader and other assistive technology look at our code, it will navigate the code through the headers. Now what is important is “the header hierarchy”. The header actually gives semantic meaning to our content. Now even though we have created a little separation in our code when we look at our page we just see the same scenario over there. Here you can notice the same too.
How to add background colour, Text colour, Font styles etc
Let’s experiment with several fonts and colours to improve the aesthetics of our website. With the use of HTML properties, we may add colours and various styles to our webpage.

As a result you can see the background colour of the entire webpage is changed. Here You can also set different colour to different elements.

We will study CSS in upcoming blogs
How to create lists in HTML?
Let’s analyze how to build lists on a website. On the web, lists are utilized generally since they are incredibly helpful. Why are lists used in HTML?
Basically HTML lists are used to display a list of data in an organized way on our web page. So we have 3 different types of lists we are going to create today.
- Ordered list: In ordered lists the items are marked with numbers starting from 1.
- Unordered list: In unordered lists items are marked with bullets
- \Description list: In description list we can add descripton after each item.
Now we’ll see each type of lists using examples. Let’s start out.
<! Doctype html>
<html>
<Head>
<Title>Ordered list</title>
</head>
<Body>
<h2>menu</h2>
<ol>
<li>biscuit</li>
<li>bread</li>
<li>tea</li>
<li>coffee</li>
</ol>
</body>
</html>
Here <ol> tag is used to define the ordered lists and the <ol> tag is used to define the lists items. Now save the file and open the webpage to see the results. There we can see the ordered list and the items are marked with numbers.
We can change the style of the list. Let’s see how we can do it.
We can do it by using the type attribute. <ol type=”A”>. After saving the changes you can see the results over there. You can see the items of the ordered lists are marked with uppercase starting from A.

In HTML, we can use 5 different styles of ordered list.
- Default Number:
- Roman number Uppercase: <ol type=”I”>
- Roman number lowercase: <ol type=”i”>
- Uppercase letters: <ol type=”A”>
- Lowercase letters: <ol type=”a”>
Unordered list
Here <ul> tag is used to define the unordered lists and the <li> tag is used to define the lists items. Now save the file and open the webpage to see the results. There we can see the ordered list and the items are marked with bullet.

Let’s see how to change the bullet style in unordered list. We have to use the type attribute like we have used in case of ordered list.
I am using the type=square. To see the result, save the file with.html extension as we are doing before.
We can change the bullet style in 4 different ways.
- <ul type=”square”>
- <ul type=”disc”> (default)
- <ul type=”circle”>
- <ul type=”none”>

Description list
Here <dl> tag is used to define the description list, the <dt> tag is used to define the terms in description list and <dd> tags are used to define the descriptions. Now save the file and open the webpage to see the results.

How to insert links in HTML webpage?
Let’s learn how to put links in HTML web pages along with its different attributes. Firstly let’s see what are html links?
- HTML links are hyperlinks which when clicked will direct to another webpage. Note that the webpage can either be any online website or a local html documents.
- The syntax for using HTML links is given on the screen for online websites. The URL will be the link of the website and for local web pages it will be the path of the HTML document and the link text is the text which on clicking will open the web page.
Now let’s create a web page for our example: In this example we will use an online website. Here I am using the URL of Wikipedia along with the link text “click to visit Wikipedia.” On opening the web page you can see if we click on the link text Wikipedia website will open.

Attribute of Anchor in HTML
- Target Attribute: This attribute determines where the web page will open. There can be five values for target attribute.
- _Self: It means that when we click on the link text the linked webpage will open in same tab.
- _blank: This means that the webpage will open in a new tab.
- _parent: it means that the web page will open in the parent frame.
- _top: This means that the web page will open in the full body of the window.
- Frame name: This means that we can specify the frame in which we want to display the web page.
Let’s see with the help of an example. Here I have inserted 2 links for what I have given different target values.
As a result we can see that one link is opening in the same tab and other one is in new tab.
- Title Attribute: Using this attribute we can display some text when we move the mouse pointer over the link text. The syntax for title attribute is shown on the screen. <a href=”url title=”text”>link text</a>.
WINDING UP
You have come a long way in your web development journey as a beginner starting with HTML. If you ever wish to get into the skin of web developer, ESS Institute, being one of the best web development institute in Dwarka offering Online web development courses and batches for offline web development course training