Creating and customizing websites is the process of web designing. Languages such as HTML for structure, CSS for display and JavaScript for interactivity are used. To build visually beautiful and user-friendly websites, designers prioritize layout, color schemes, graphics, and user experience. Additionally, they might use content management systems and consider device responsiveness. It includes a range of expertise and disciplines that come together to provide a useful and entertaining online experience.
In this article, you will get to learn complete HTML from scratch to expert level, prepared by one of the trainer from top web development institute in Delhi. Lets begin by setting up our system
HTML Complete tutorial
VS code setup, installation and first HTML Code
Here we are going to show you how you can install Visual Studio code on your Windows. So, let’s get started.
1) To start with, just open up the browser and search for Visual Studio code.
2) The first link appearing here is from “code dot visual studio.com”. We are going to click on this link and once this website is open straight away.

3) You will be able to see the blue download button for Windows. So, we are going to just click on this button which is going to download this executable file and click on download for window.

4) Now this executable file is downloaded. So I’m going to just click on this file and here appear a box where we have to first of all click on the Run button and then we will be going to just agree with the license terms and conditions.
5) Click on Next button and this will be the location where Visual Studio code will be installed on your operating system.
6) Just click on the next button and here are some options which you can choose according to you and here we are going to just check all the options and then going to click on the next button and install.
7) Visual Studio code will take few seconds to install. So we will wait for the installation to complete.
8) Now as you can see the Visual Studio code setup has been finished and here is the page that appears when we open VS code.
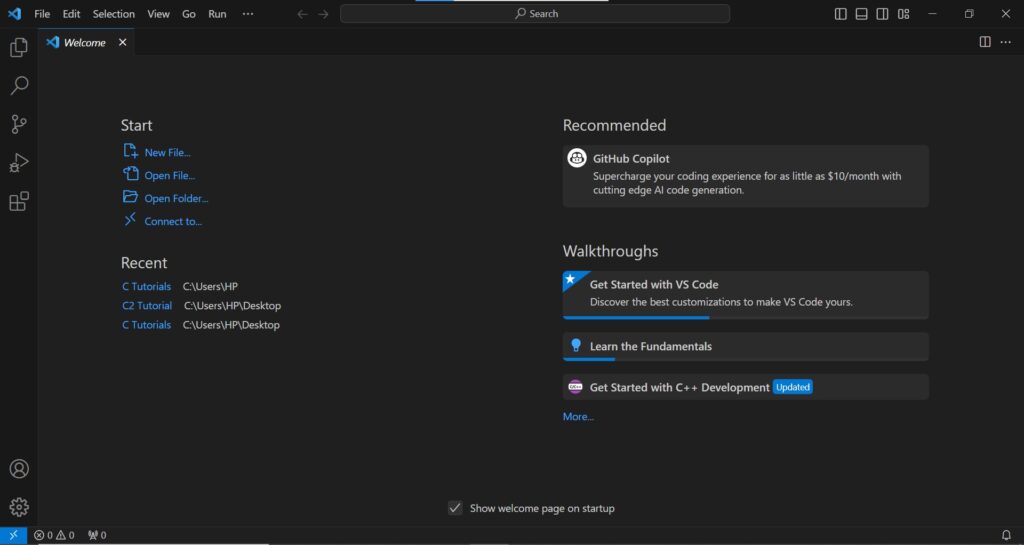
1) Let’s See, how to run html files using visual studio code. So we need to install a new extension called “open in browser” by clicking on this extensions button.

2) Click on this first extension and Install it. After the extension is being installed correctly, we can close this page.
3) To start writing your first code, you guys have to create a new html file.
4) Click on “file” and “open folder”.
5) Create a “new folder” I will call it HTML Tutorial.

6) Let’s select the folder and then create a new html file say “hello.html”.

7) Now write some html code, just type – exclamation mark and then hit enter. Here we obtain this template and we can change it accordingly like the title and also we can write some text in the body.

8) Save this file (ctrl + s)
9) To open it in the browse, make a right click on file name and then “open in default browser”.
10) We will obtain this page in the browser.

Learn HTML in Web Development tutorial for beginners
HTML tutorial using Notepad for beginners
Boilerplate in HTML
A boilerplate in HTML is a template you will add at the start of your project.
Let us say you are writing a code for your website and you do not want to write all the basic code by yourself.
1) For what you want to have some shortcut, and there’s a good news “VS CODE” has a shortcut for this boilerplate. First thing, you just need to start coding simply by pressing (shift+1) which will going to return exclamation mark on your screen on your code editor.
2) Here appear two options from which you have to select the very first and boom here you have your boilerplate ready in front of you.
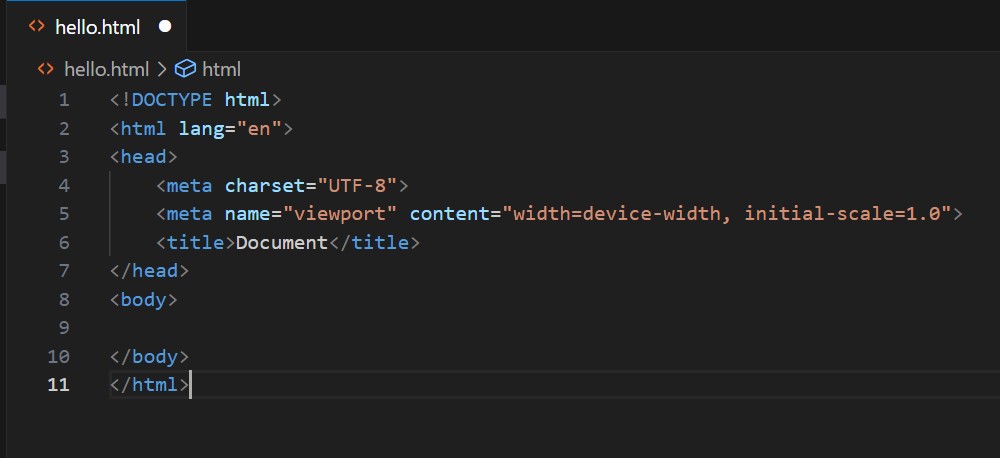
Here Are Some Basic Components Of HTML BoilerPlate
1. <! DOCTYPE html>: It specifies the version of HTML being used. HTML 5 is the most recent and extensively supported version in instance.
2. <html>: An <HTML> is the base element of the page. Every other HTML element on the page is contained within it.
3. <head>: The head section has metadata about the document, including connections to style sheets, the title, character encoding, and other metadata. It doesn’t have any content that is seen on the webpage immediately.
4. <meta charset=”UTF-8″>: This meta tag indicates the document’s character encoding, which is usually set to UTF-8 to accommodate a large character set.
5. Using the meta name=”viewport” and content=”width=device-width, initial-scale=1.0″ This meta tag facilitates creating the webpage to various screen sizes, particularly on mobile devices.
6. <title>: This element sets the webpage’s title, which shows up in the title bar or tab of the browser.
7. <Body>: All of the material that will be shown on the webpage, including text, pictures, links, and other media, is contained in this area.
Heading in HTML
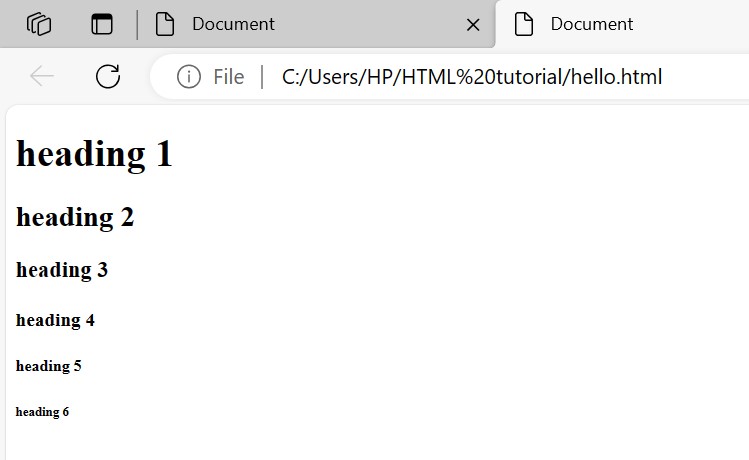
Let’s learn about some tags to the body and see what they look like. Beginning with our heading tags. We have our opening and closing heading tags numbered <h1> to <h6>. <h1> defines the most important heading. This should represent the main heading/subject for the whole page. Heading are a way to create emphasis and a sense of visual hierarchy of information.
<h6> defines the least important heading.
DO NOT SKIP the heading levels. You must write <h3> after <h2> and so on.
1) Let’s try writing by ourselves.

2) For output, we need to save the file in our code editor.
3) Right click on the file and tap “open in default browser”.
4) And this is how all the headings are printed on the screen.
<STRONG> TAG
Let’s see how strong tag works in html and how to use it properly. Before you decide to markup your text, you need to answer three questions.
Is the text super important? If yes then you must use strong tag. Is it super urgent? If yes then you must use strong tag as well is it very serious? If yes then you must use strong tag. Again now let’s write some code and learn how to use strong tag properly.
Here we will open up the html document we have created.
Using visual studio, I have a block of text and saying that “Believe in yourself and all that you are. Know that there is something inside you that is greater than any obstacle anddon’t wait for opportunity, create it.” As you want to make more emphasis on bolded sentence.

So we just mark up this part using html strong tag.
So, the opening strong tag looks like starting with left angle bracket (<) strong and right angle bracket (<strong>) and a closing strong tag looks like this starting with left angle bracket, forward slash strong and right angle bracket (</strong>).
Save the program and let’s try this up in the browser.

Text content i marked up using strong tag is rendered as a bold text. But that doesn’t mean you to make your text bold. Because you can only use strong tag if your content is super important or super urgent or super serious.
<EM> Tag
Try answering question before we actually get to know about the use of <em> tag. Is there any word or phrase you want to place great emphasis. If yes, then you must use <em> tag.
To wrap it up, now let’s write some code and learn how to use <em> tag properly.
I have written two sentences. 1) This is not a joke. If you paid close attention when i speak out the sentence, i stressed more emphasis on the word not compared to other words. So we can just wrap the word NOT with the <em> tag.
2) We have to leave now. Again, more emphasis will be on the word “now” compared to other words. Perform the same steps you did with earlier sentence.
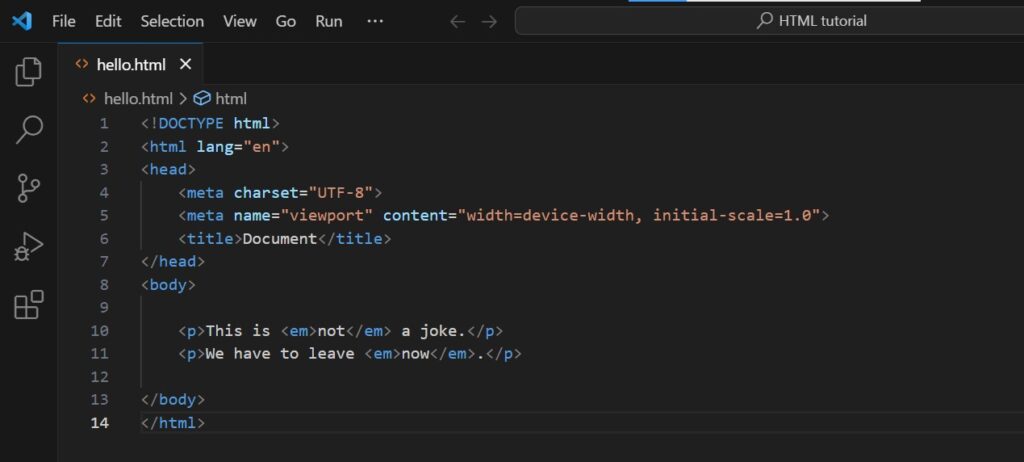
Save your document and try this up in the browser.
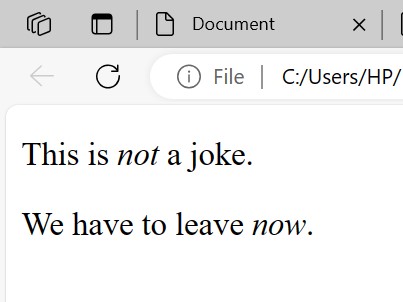
Content we enclosed up using <em> tag is italicized. But it doesn’t mean that you can use <em> tag if you only want to make your text italic.
Paragraph Tag <p>
Almost all websites use text and one of the most common ways to organize text is with paragraphs. You can create paragraphs in html using the <p> tag.
You’ll need a start tag and an end tag by default. Each paragraph will have a little bit of margin above and below it to give it some space between other elements. It’s very common to use the <p> tag whenever you’re working with a large amount of text.
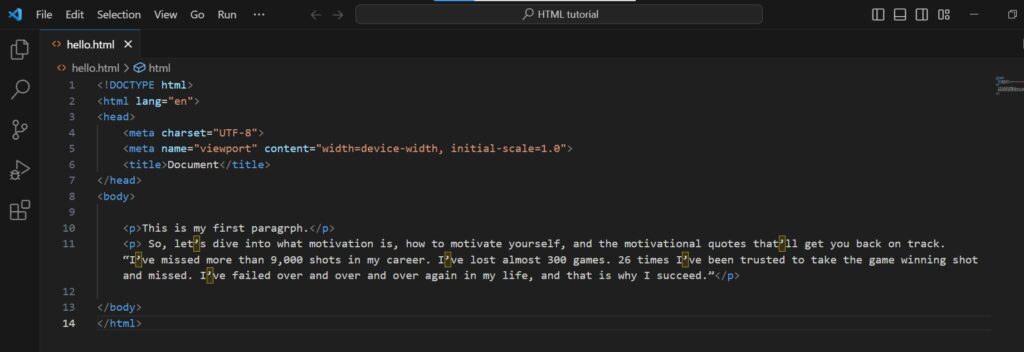
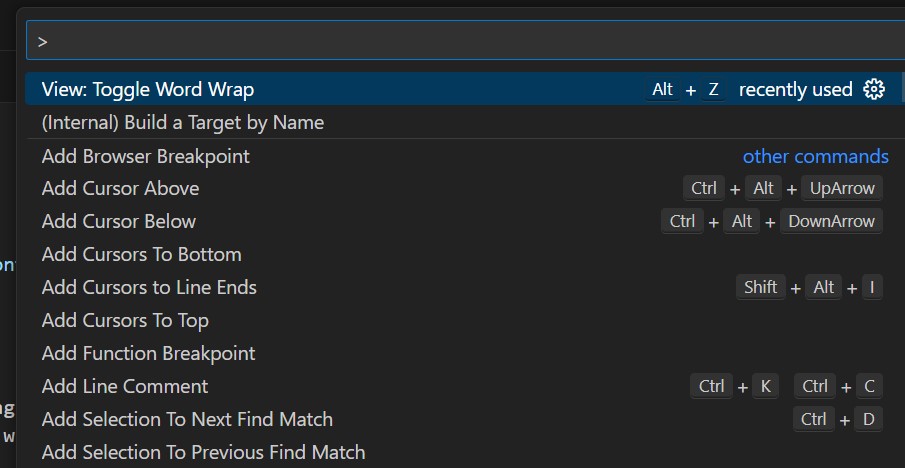
If you want to enable horizontal scroll, right click and click on command palette.

Search for toggle word wrap and the thing will be done.
Learn Web Development Online with our Web Development certification course covering HTML, CSS, JavaScript and everything you need to create a new website.
<INS> Tag
The <ins> tag in HTML is used to indicate that a section of text has been inserted into a document. This tag is typically used in conjunction with the <del> tag, which is used to indicate deleted or removed text.
Here’s a common scenario where the <ins> tag might be used: Let’s say you have a document or a webpage that is being collaboratively edited by multiple people.
If someone adds new content to the document, you can use the <ins> tag to highlight that added content.
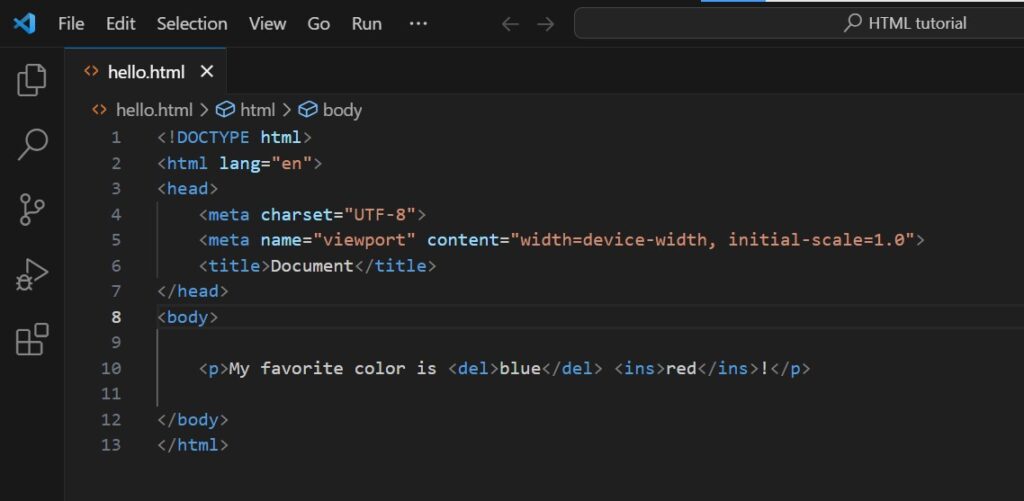
In this example, the text “newly added” will be visually distinguished (often underlined by default) to indicate that it’s new content.

Super script and subscript
Superscript and subscript are typographical elements used to format text in a way that it appears above or below the regular text line. They have different use cases:
1) Superscript (<sup>):
Superscript is used for characters or numbers that are raised above the regular text line and which can be commonly used for Exponents in mathematical expressions ( x²), Ordinal numbers (1st, 2nd), Trademarks or copyrights (™, ©) and some others.
<p> Chemical formula of water is H<sub>2</sub>O</p>2) Subscript (<sub>):
Subscript is used for characters or numbers that are lowered below the regular text line and commonly used for Chemical formulas (H₂O), Mathematical notations (CO₂), Footnote references in mathematical expressions (x₁, x₂).
<p>X <sup>4</sup>+ Y<sup>6</sup></p>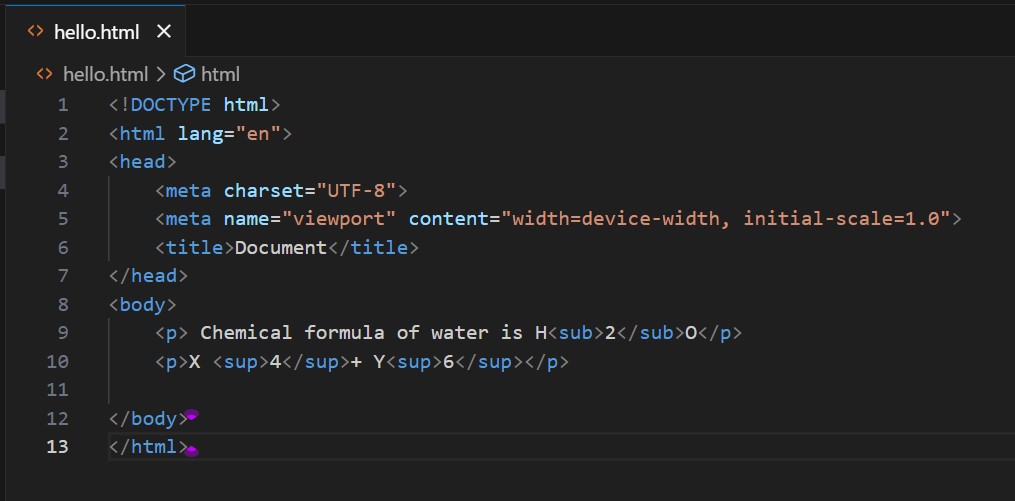
Save and document and right click to reflect it on the default browser.
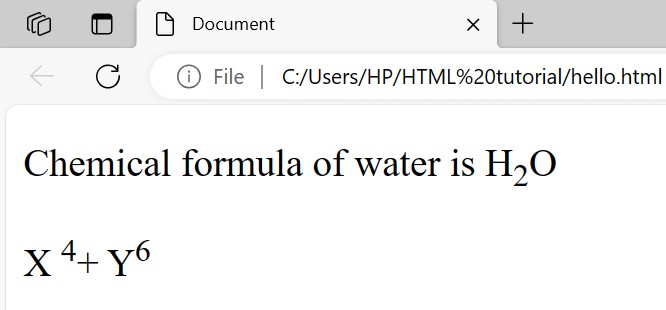
The superscript will raise it up like an exponent and the subscript will lower it down below the regular text. You can also create fractions in the middle of text or equations or chemical formulas. Hopefully you’ll use this in your scientific webpages and mathematical webpages or just for fun maybe.
HTML Entities
HTML entities are what we would use to display reserved characters which the browser would otherwise interpret as being intended for writing code.
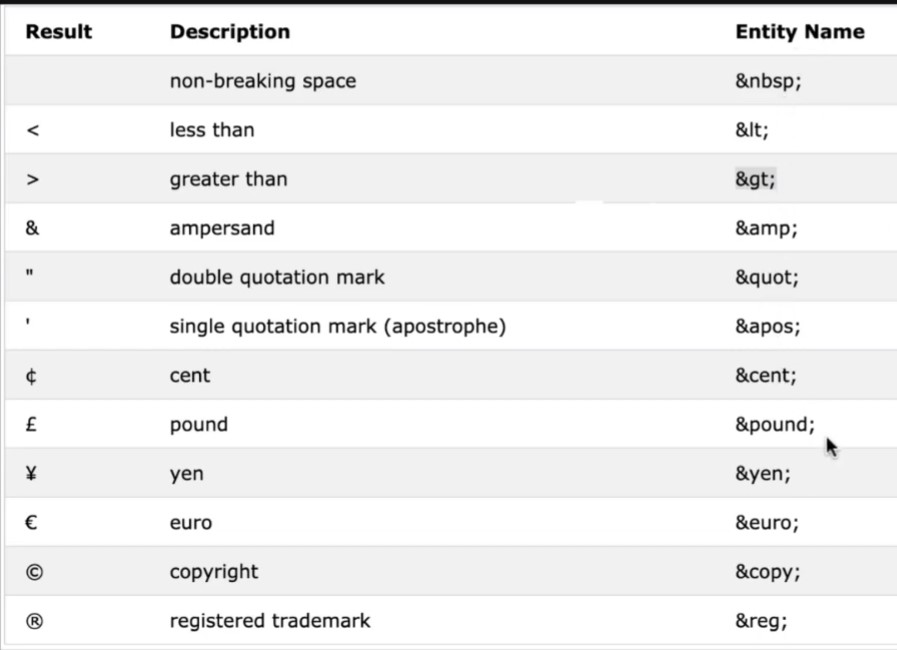
As an example: There would be the angled bracket that we use when making our tags. If we were using the (less than) angled bracket then the browser would interpret any text that follows as the name of some element’s opening tag. So to display these characters as a text we can replace these reserved characters that confuse the browser with a corresponding html entity. Here I have a table which shows available entities that we can use in html.
I am writing a paragraph and here I tried giving spaces like this will you expect? You will expect that all spaces should be printed. But look what happened here. The spaces are not printed. Why did this happen?

This happens because, by default HTML It chops of all spaces and it considers it as one. So what do you need to do over here?

If you want to use additional spaces, then you need to use Html entities.
How we can do that? So here, we will write “ ” for every extra space you want to add. nbsp is non-breaking space.
<p>This is my first           program</p>You will save your document and you will look there that another one space is added.

You won’t use it that much in your websites. Nbsp website does not at all look good. Don’t use it at all to bring spaces, because we will use margin padding and CSS selectors and properties are there we will use all those things.
Now, look at one more scenario. Here suppose if I want to write <p> as text and this should come in written so look what happened? Look at this, Where is my <p>? I have written <p> also over here.
But I want to see this in my website. How should I bring this? If I write this, then it will consider it as a tag.
Here you write < for smaller than angular brackets and over here write > for greater than angular bracket and as you do this, <p> will be shown as text on browser. If you want to write this you can’t write it without this. And these are html entities.
<p>paragraph is written like <p>.</p>
Html entities are not just used for these. You can even use html entities to write such characters which are not even present in your keyboard or on your keyboard they are as special characters. Like we can write pound symbol (money) and many other things that we will show you with some examples.
Suppose here I have to write “pound”. So, here I will write something like “£” and here I will write pound is written like “£”. Now look over here pound has shown in browser. And don’t get confused at all.
<p>Pound is written like this £. </p>
Similarly, if I have to write something like some special characters we can make use of HTML entities with the help of the table given above.
<PRE> tag
The <pre> tag is used to define preformatted text. This means that the text is displayed in a fixed-width font (usually a mono-spaced font like Courier) and maintains both spaces and line breaks.
It’s commonly used for displaying code snippets, poetry, ASCII art, or any text where the spacing and line breaks are significant
If you write like the code shown below, then it will come as it is. Keeping all the spaces intact and all the new lines intact but here it is not that tag will show up. For tags we have to use entities only.
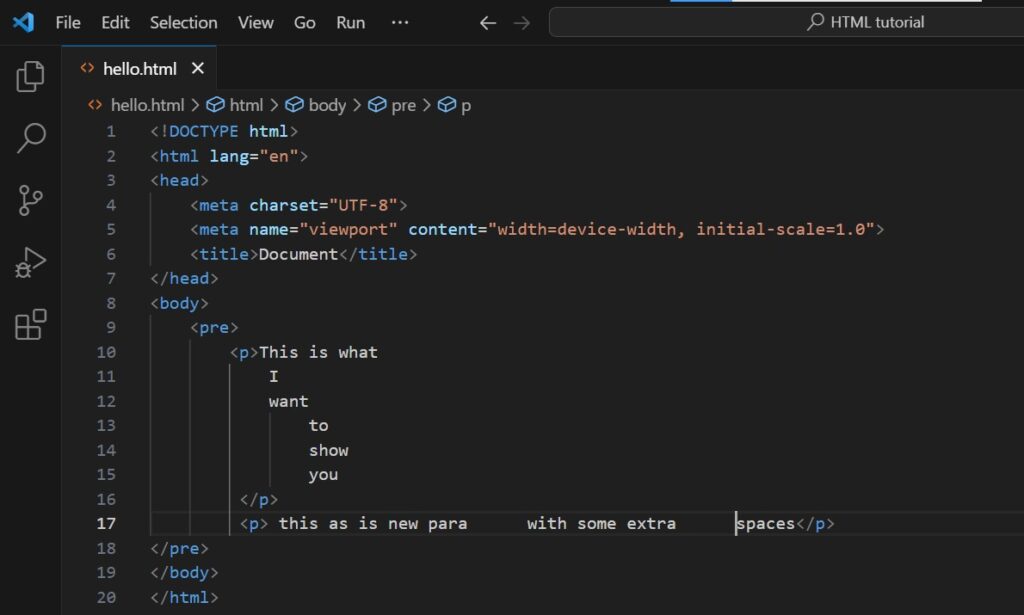
Save the document to show the

Images in HTML
Let’s talk about images; it’s very simple to insert it.
You have to write the img and as soon as you write the img and press enter, you will be going to get src=”” alt=””.
Here in “img scr=” You have to provide the source of the image i.e. where is your image, either it can be on the internet, or it can be in your local.

If you want to enter the “url” of an online image, perform this by right clicking on the image.

If it is in your local then what will you have to do is to enter the full path of image.
What is the meaning of “alt” that if this image is not loaded then what text to show? Here I have written “please check your internet connection.”
This is how the image is perfectly shown and the text “Please check you internet connection” because of that particular image doesn’t existed on the given path.

Row Span And Colspan In Table
To create table in our program we will use table tag.(<table> </table>)
There will be 2 things inside the table.
1) <thead>: It will come under the head of the table.
2) <tbody>: it will come under the body of the table.
There is no need to mug up, you guys will automatically going to get this easily. We start with a row with the help of a (<tr>) and inside the head by writing (<th>) under <tr>.
<table>
<thead >
<tr>
                <th>Name</th>
                <th>Employee Id</th>
                <th>Employee role</th>
            </tr>
        </thead>
Ok, my <thead> done now you will add data here in the table.
Now, you Have to make a table row, and I will not write (<th>) inside it, this time I will write (<td>) i.e. table data.
Now, to add more columns, put another heading and keep adding data.
<tbody>
            <tr>
            <td> Rohan </td>
            <td> xyz</td>
            <td> Analyst</td>
            </tr>
            <tr>
            <td> Mohan</td>
            <td> abc</td>
            <td> programer</td>
            </tr>
            <tr>
            <td> Sam</td>
            <td> pqr</td>
            <td> HTML expert</td>
            </tr>
        </tbody>
Save your program> right click> open in default browser> output.

Colspan and rowspan are attributes used in HTML tables to control the spanning of cells:
Colspan (Column Span): To make a cell span over multiple columns, use the colspan attribute. The value of the colspan attribute represents the number of columns to span. Colspan allows a single cell to span multiple columns horizontally. It’s useful when you have a header or data cell that should cover more than one column.
If you want a header cell to span two columns, you would use colspan=”2″.
Rowspan (Row Span): To make a cell span over multiple rows, use the rowspan attribute. Rowspan allows a single cell to span multiple rows vertically. It’s useful when you have a header or data cell that should cover more than one row.
If you want a header cell to span two rows, you would use rowspan=”2″.
Conclusion
You now have enough knowledge to know use different elements, properties, and the structure of HTML pages to create creative websites. Recall that in order to improve your web development abilities, you should never stop learning and investigating increasingly complex aspects.
Bootstrap Framework for Web Development | Learn Web Designing
HTML is just a structure of your website or web app, you will also need to have hands on CSS, javascript, bootstrap for styling and functionality along with one server side language too. You can learn all of them together offline in Dwarka at Best Web Development institute in Delhi, from 4 different locations (including Dwarka MOr, Kakrola, Nangloi, Bahadurgarh)
Frequently Asked Questions
No, HTML is a Hypertext markup language that will help you to create a structure for your website. You still need to know CSS for styling and JavaScript for interaction for creating a basic website
Yes, you can use any tool like Notepad++, Notepad, Sublime, Adobe Dreamviewer etc.
You can go to the next line using <br> tag
HTML entity is used to give space within the line
<head> tag contains the metadata of the document for browsers and search engines like title of page, styling files associated, author etc.
