
2022 is the time when Graphic designing, social media are somewhat at peak and will remain at it for a long time. Hence Graphic Designing tools like Photoshop, illustrator, canva become an essential skill to survive in jobs as well as business. The article focuses on helping you explore Photoshop using basic introduction and starter tools.
Even if you aren’t a trained graphic designer, you have probably heard of Adobe Photoshop. This fantastic application is useful for both personal and professional use. Learning how to use Photoshop may be simpler than you think, despite the fact that it can seem frightening or overwhelming.
There are numerous Photoshop and its tools tutorials and how-tos available that may teach you the ropes, from beginner to expert level lessons.
Don’t worry if you’ve never used image programme before. You will learn the fundamentals of how to begin learning how to Photoshop photographs in this video. You can progress to more complex Photoshop tutorials once you’ve mastered the fundamentals.
How to use Photoshop?
Thousands of individuals worldwide in a variety of positions utilise the imaging and graphic design programme Adobe Photoshop. Photoshop may be used for more than just images; it can also be used to design websites, edit films, and produce 3D artwork. You must first purchase a plan and download Photoshop to your smartphone before you can begin using it. Once the software has been downloaded, you can begin to familiarise yourself with its simple interface.
Introduction to Adobe Photoshop

Before you begin using Photoshop, it’s crucial to comprehend the structure of the user interface. The program’s main menu is visible at the top when it is opened, just as in other programmes. The primary tools are displayed in a sidebar on the left side. The colour tool and the layers tool are located on the right side.
How to open a document in Photoshop
On your computer, select “File” from the top-left menu to start a new document or open an existing one. To start a brand-new, blank document, select “New.” Alternately, you can click “Open” to browse your computer and open a pre-existing file.
A dialogue box will appear when you create a new document. You can give the file a name and choose the desired size and resolution in this window. If your website needs a specific file size to display photos correctly, this is useful. The size of our image is 450 pixels high by 880 pixels wide. For web photos, a resolution of 72 pixels per inch is suitable. However, we advise 300 pixels per inch if you want high-quality for printing.
Click “OK,” and presto! You are prepared for work.

Remember that Photoshop will “lock” this new document, preventing you from editing that layer directly. Simply click the lock icon in the layer name to unlock it, and it will vanish. To discover more about layers, continue reading.
Photoshop toolbox | Basic Starter tools in Photoshop
Easily accessible and basic tools in Photoshop are available in Toolbox. So You will rely on the toolbox on the left sidebar the most. The tools are grouped according to what they do.
- Tools for selection, cropping, and slicing. Use them to trim and slice off areas of your photographs that you don’t want to include, or to choose areas of your images that you wish to alter or enhance.
- The tools for retouching and painting. Use them to remove undesirable stains from product items, add drawing or colouring to your photograph, or enhance it by sharpening or blurring key areas.
- Tools for writing and sketching. Utilize them to add text over your image or manually doodle graphics with the pen tool. The pen tool will be covered later.
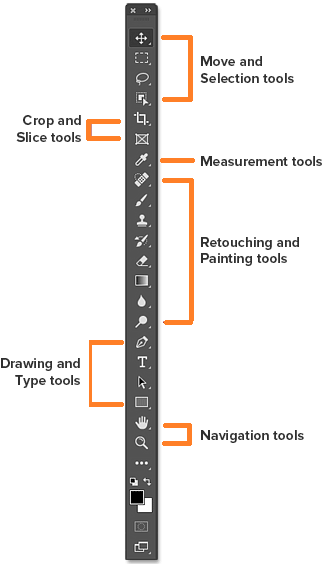
When you click one of the tools in the left sidebar, the tool’s choices will appear under the top main menu. These will be covered when we go over each tool.
How to use photoshop Actions
How to use layers in photoshop
Speaking of layers, even for the most simple Photoshop lessons, this is a crucial component to comprehend while learning how to use Photoshop.
The performance of Photoshop could not be what you would like it to be, and you might discover that the issue is with your layers. Knowing the fundamentals of Photoshop before using it will help you avoid frustration and problems.
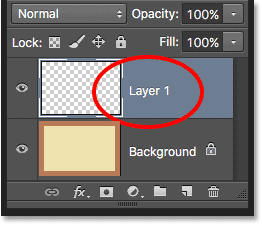
Layers are likened to sheets of glass stacked one on top of the other. When your image contains many layers, it is easier to make changes to one area of it without affecting the other areas of the final product. By selecting the eyeball icon to the left of each layer’s name, you can quickly add or delete layers as well as “hide” them
Photoshop tools for Beginners
Photoshop frequently generates a new layer for your operation automatically. If you use the type tool to add text to the backdrop image or if you upload another image into your project, it will create a distinct, unnamed layer.
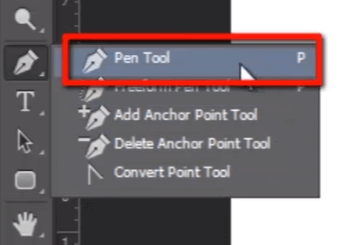
How to use pen tool in photoshop
Among most used photoshop tools, Pen tool help in clear and sharp selection without pixelatting and blur
Two layers are shown in the sample above: one for the background image, and one blank. When working, we strongly advise giving your layers names to avoid confusion. Simply double-click where it reads “Layer 1” and enter any text there to accomplish this
Now, we can simply click the blank layer and drag it about the document without affecting any other sections of it.
By clicking and holding the pen symbol while choosing the one that says “Pen Tool,” you can choose the default Pen tool. You can also use the keyboard shortcut “shift + P” to cycle through the various Pen tools by selecting the toolbox’s primary icon.
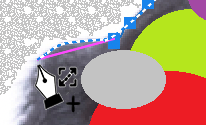
You’ll make an anchor point each time you click on your document. Anchor points serve as the corner or the curve of your form.
By clicking all the locations where you want the star’s corners to be, for instance, you can draw a star. Click the first anchor point you drew to shut the star.
To draw a shape with curves:
- To move the initial anchor, click the desired location. However, don’t let go of the mouse; instead, drag it to draw the direction lines that will shape the curve. Your direction lines’ length and slope will determine the curve’s shape. As soon as you have created your direction line, let go of the mouse button.
- Click where you want your curve segment to end in order to change the curve’s angle or direction. Consider a curve in the any shape. To do this, click to create your second anchor point and then drag the mouse in the direction of intented curve. Repeat
- Continue until you have the desired shape. Please take note that you have the option to move any of your anchor points or the endpoints of any of your direction lines. Before clicking any of these points, hold the “Control” key down, and maintain holding it until the task is complete. You can type “Control + Z” to go back to the previous stage if you mistakenly added an extra point by forgetting to press the Control key (or you can choose Edit Undo in the top menu). Just keep in mind that Control + Z works for everything in Photoshop.
How to use type tool in photoshop
Using the Type tool, you may add text to your image. You can choose whether to type horizontally or vertically by holding down the Type tool icon in your left toolbox.
Similar to the other tools, more options will be available when you select the main menu. You can also edit on the Character panel, which has a few extra options.
Photoshop has a large selection of built-in font styles, but if you have a unique font for your company, you can always add your own. Installing the OTF or TTF file into your fonts folder on your Mac or PC can accomplish this. When you restart your computer, Photoshop ought to have the font at your disposal.
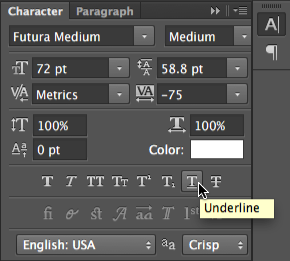
The type tool has a lot of options, including changing:
- The font size and colour, as well as the italic, small-caps, strikethrough, underline, superscript, and subscript styles
- The distance between each line of text and each letter, respectively
- The text’s height and width, or its vertical and horizontal dimensions
How to use gradient tool in photoshop
A gradient is a seamless change in colour between two or more hues. For advertising or product photography, gradients make excellent backdrops. They may be an easy method to add colour and a polished appearance.
You can design your own custom gradient or select from predefined alternatives when using the gradient tool.
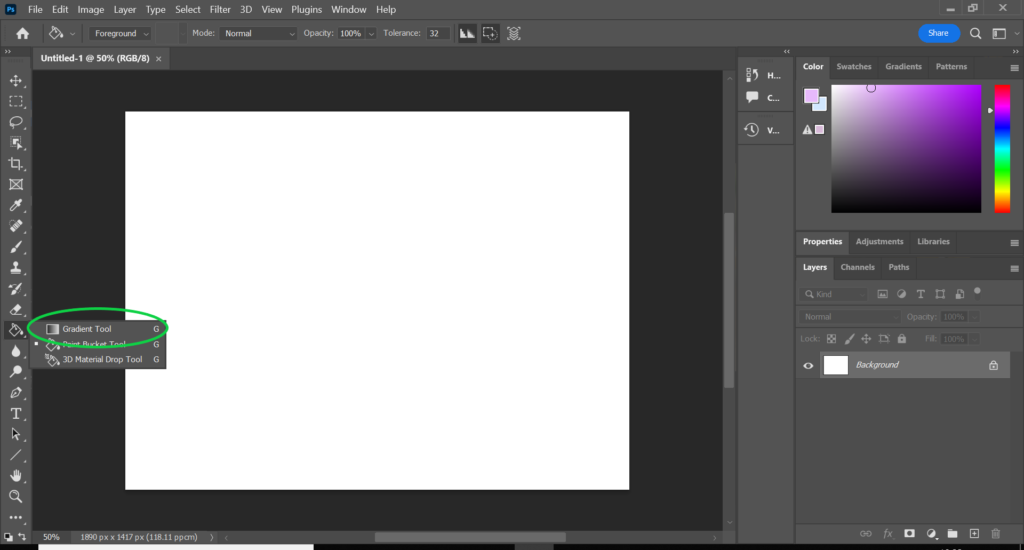
To create a gradient:
- Select the paintbrush icon. Keep pressing it until the menu appears. the “Gradient Tool” option.
- Utilize the option menu that appears beneath the primary menu bar. You can choose from the preset gradients by clicking the dropdown menu.
- Similar to the other tools, more options will be available when you select the main menu. You can also edit on the Character panel, which has a few extra options. The coloured stops that appear on the line beneath the “Smoothness” box can be double-clicked in order to select custom colours for a pre-made gradient pattern.
- Click OK after selecting the gradient options you desire. You may now draw the gradient on your page by clicking the starting point, holding down the mouse button while dragging the line to the place where you want the gradient to end. For instance, click and drag from the top left corner to the bottom right corner of the document to make a gradient.

In the top menu, you’ll see five total gradient options
A straight line, such in the example above, is a linear gradient.
Radial gradient: A symmetrically extending circular pattern from the origin. An angular gradient is a sweep about your starting point that is counterclockwise. A mirror-image linear gradient on either side of your starting point is known as a reflected gradient.
Diamond gradient: A diamond pattern extending from the centre to the edges.
How to Use Lasso Tools in Photoshop
The Lasso tools in Photoshop make it easier to pick out certain areas of an image so you may isolate, remove, or edit/enhance that area independently from the rest of the image. This is apart from marquee tools that only allow you to make rectangles or circles because you can also construct bespoke shapes.
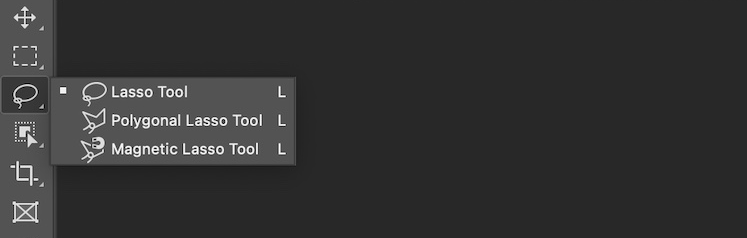
There are three options for the lasso tool:
- Regular Lasso. To utilise this, simply draw the shape that needs to be removed while keeping the mouse button holded. Retrace your steps to your starting point if you want greater control over how the selection closes. If you don’t go back to the starting place, a straight line will be drawn from start to finish to signify that the selection is finished.

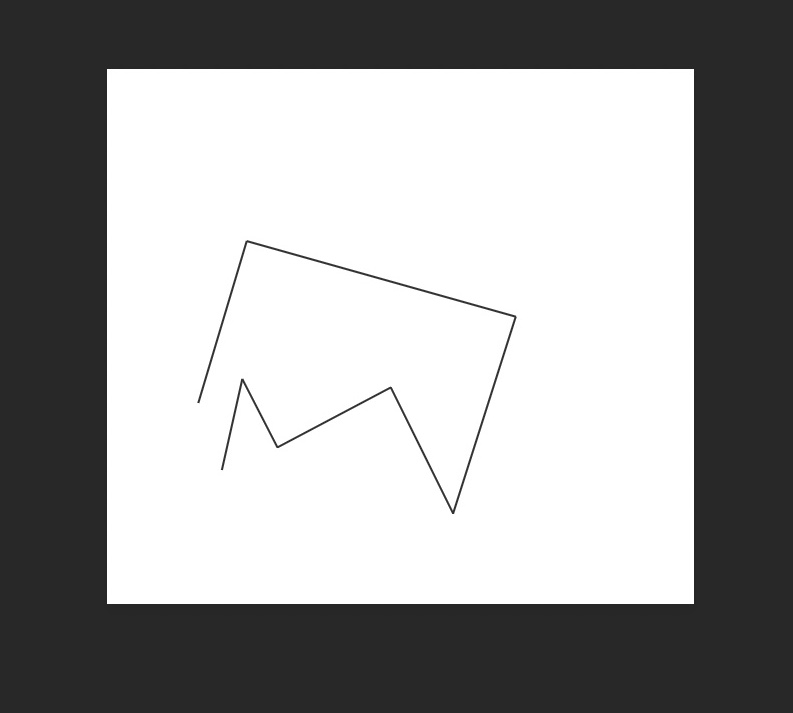
- Lasso with polygons. You may create a polygon with straight sides with this tool. You can click each point where you want a line in your polygon to stop rather than dragging the mouse to build the shape you want.
- Lasso Magnetic. This device is “smart” for greater accuracy. You can pick an object more accurately than you could manually because it automatically latches to it. Simply click the edge of the object to start tracing it, then keep the mouse button depressed as you go. When you release the mouse button, Photoshop makes a selection. Photoshop will make a selection when you let off of the mouse button.
Holding down the “Control + Shift” keys while drawing more will allow you to expand or contract a specific area of your selection. Holding down the “Control + Alt” keys will allow you to reduce the size of your selection. The “Add to selection” and “Subtract from selection” options in the menu bar for the Lasso tool, which appears beneath the main menu bar along the top of the screen, can also be used to achieve this.
Once more, if you unintentionally deselect something, you may just key “Control + Z” to restore it. Lifesaver! Type “Control + D” for “deselect” to remove your selection from the screen. This applies to all Photoshop selections, not just Lasso selections.
Key Advantages of Photoshop For Small Businesses
- Continuity in Branding
It can be difficult for small businesses to develop consistent branding reach and awareness without a graphic design tool to rely on. Using Adobe Photoshop, you can help your audience quickly and easily recognise your brand across a range of platforms, making it easier for them to determine and make an intent to or not to make a purchase from you.
- Superior product photos
Producing high-quality product images can make the difference between customers choosing to buy from you or your rivals. Goods images are the most realistic depiction of your genuine product for internet customers. By using Photoshop to enhance the photographs, you may boost consumer confidence in your brand and persuade website visitors to choose your business over rivals.
- Web design
Small businesses don’t really have a web designer or developer in their staff. You’ll require a method of artistic communication if you choose to work with a web design business to express your needs. Photoshop is a great tool for this since you can get a PSD website template and customise it before giving it to your company for use.
Conclusion
Starting a dropshipping business may make good use of having some basic image editing skills. Simple Photoshop tutorials are a great way to learn how to edit photos on your own. In addition to this one, you can find a tonne more Adobe Photoshop lessons, including those for beginners, experienced users, and professionals.
With a simple Google search, you can find out how to use Photoshop like a pro and level of proficiency that work for you.
As your abilities and skills develop with time, you’ll manage more of your digital assets independently rather than relying on a design expert. By learning Photoshop, you can make sure that everything ends out exactly way you want it to while also saving time and money.
Learn Graphic Designing from the best Graphic Designing Institute in Delhi with leading Graphic design trainers and industry standard online and offline graphic design courses