Microsoft Word is the industry standard for word processing. More than one billion computer users depend on the program every day as a component of the Microsoft Office productivity suite. That represents about one in seven people on the planet, a remarkable figure unequaled in the technological sector.
Despite the fact that Microsoft Word is so widely used, not everyone is aware of all of its features. There are numerous capabilities in Word that can make it simpler to create documents, reports, and text files. The ultimate purpose of any piece of software should be to make your day-to-day work easier so that you may be more productive and effective.
Here are 10 of some easier Microsoft Word time-saving hacks, tips, techniques, and shortcuts. (While the majority of these recommendations are compatible with all versions of Word, a few only work with Word 2013, 2016, or Word 2016 for Mac.)
Best Microsoft Word Hacks to use it like a pro
1. Stay focused by hiding the ribbon and opening the full-screen mode.
Writers seek tranquilly. When looking for a simple view of the text, Microsoft Word may feel a bit difficult at first sight to any non-technical user because of its features.
Hide the ribbon menu

You can quickly hide the Ribbon by using a shortcut key. To turn off the Ribbon, use Ctrl + F1.
The Ribbon’s behaviour can be modified so that it automatically disappears when not needed. To do this, choose Auto-hide Ribbon by clicking the Ribbon Display Options icon (located next to the minimise symbol).
Distraction-free Reading
With Word 2010 and later, a more specialised capability called distraction-free reading is offered. The Read Mode functions nicely on a regular laptop even though it was initially created for touch-enabled tablets. Press Alt, W + F at the same time to fast access it.
Optionally, use the buttons:
- Go to View tab> Click on Read Mode on the Ribbon menu
- See Read Mode button at right of the Status Bar
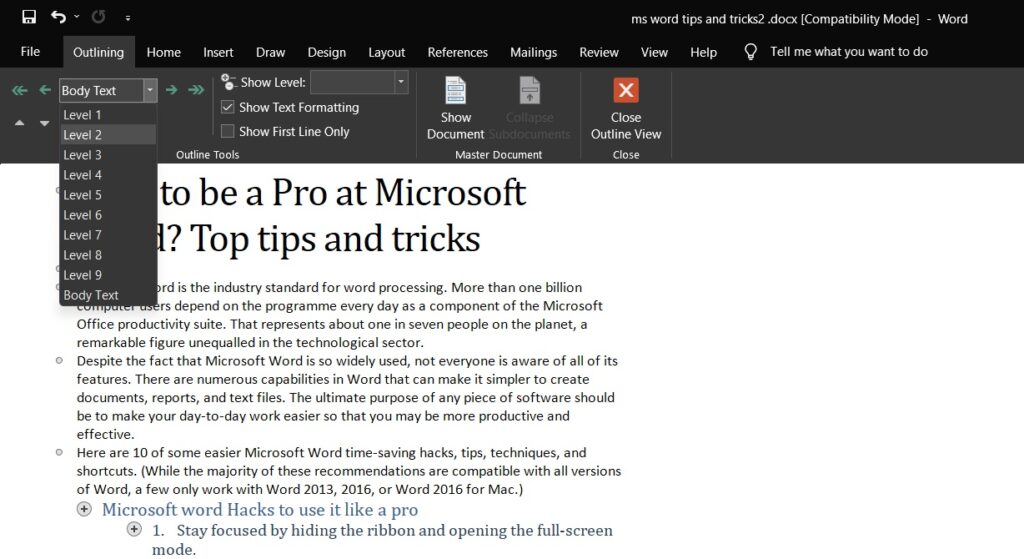
2. Reorganize With the Outline View
The best advice for writing efficiency is to rapidly finish the first draught after outlining your primary thoughts. The Outline View can boost your productivity with huge papers by 50% when used effectively.
Go to the View tab on the ribbon and then click Outline.
By rearranging text blocks and the nine levels of headings in a complex document, Outline View enables you to fine-tune its structure. Outlining View opens a unique toolbar with tools for elevating or lowering selected text. Select text can be hidden or made visible using the controls.
- If requirement is getting to a specific point in a long document? Just switch to Outline View, this helps to jump to a specific point via heading level.
- If wish to draft quickly? Start with Planning out the most important main sections on Outline View followed by switching to other layouts in a document to write the body.
- If you need to reorganize the document? Just go with Dragging and dropping the heading without limiting to only that level of heading. It also allows to move the sublevels under it which contains the body text. Use the arrows to work-out the movement.
- Hacking the headings to quickly format then with Headline templates 1, 2, and 3 given above at the top instead of changing the size and using uppercase, font-weight or line height etc

3. Brainstorming with MS word
Click anywhere twice to start typing. If you don’t want to, you don’t have to worry about cursor placement. The closest MS Word gets to freestyle writing is this. Word 2002 introduced Click and Type. Only the Print Layout view or the Web Layout view provide the capability.
You can use this as a free-form mindmapping tool for spontaneous brainstorming in addition to using it to insert text and visuals.
4. Table to Graphs in 3-Steps
Choose between a perfectly laid out table with a tonne of data and a beautifully crafted chart that shows you that data.
Being visual creatures, choosing the latter is frequently obvious. Chart creation from tabular data is simple in Word. Instead of overloading with Excel when you don’t have a lot of tabular data, design a chart with Word. Choose the data table, then take the following three actions:
- Switch to the insert tab from top
- Select chart tool inside group and click on Object dialog box
- From Object Types, select Microsoft Graph Chart and Click OK

Or directly click on chart on the insert tab and select the intended chart
Word automatically will display the tabular data in a form of column chart. Edit or change the data on the data sheet to see changes in the chart. If the column chart seems not a good representation, choose from the different types of graphs and charts. Follow the given steps:
- Double-click your chart.
- Right-click on white space within bounding box of the chart
- Select Chart Type.
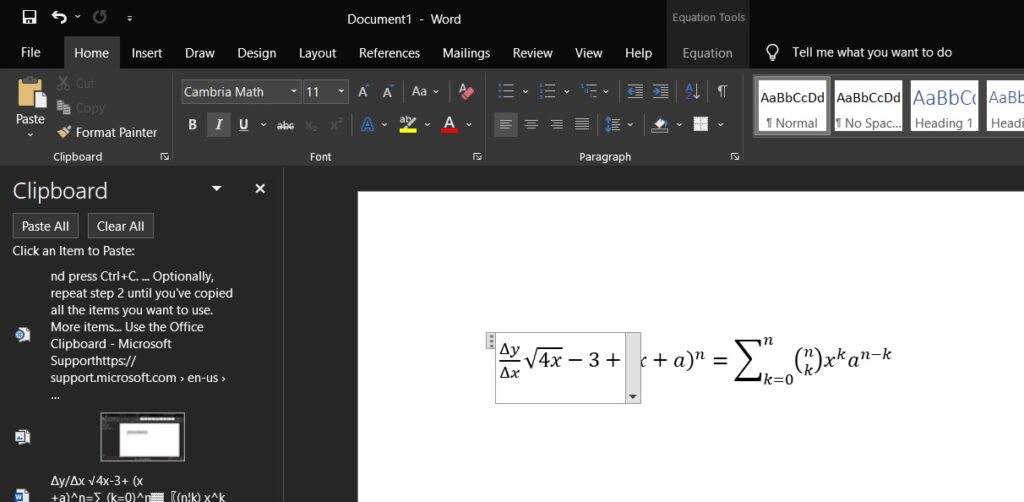
5. Write Equations in Microsoft Word
Excel formulae are not the only ones that are fantastic. An essential component of Microsoft Word has always been the Equation Editor. Its name in the most recent Word versions is simply Equation. Choose Insert tab> Go to Equation > Insert New Equation to use it.
Create your own complex equations for mathematics, physics, or chemistry using the Equation Toolbar. With only one click, Word allows you to incorporate a wide variety of well-known equations.

6. Clipboard with 24 items
The Office clipboard has a capacity of 24 items and is compatible with all Office files. To display the panel on the left, click the tiny drop-down arrow next to Clipboard on the Home tab. The shortcut to open the Clipboard Panel is to press Ctrl + C twice.
Clipboard allows cut, copy, and move multiple pieces of text, charts, images and objects anywhere within that particular document or between other already opened office apps thanks to this holding capabilities.
To modify the functions of the clipboard, use its options. For instance, you can turn off the setting for the Word window’s bottom-right copy count indicator, Show Status Near Taskbar When Copying. It is by default turned on.
7. Translate Languages on the Go with Microsoft Word
All translations in Microsoft Office are handled by Microsoft Translator. Use the Review tab’s Translate option. Translate a phrase or a word. Alternately, translate the whole thing and display it in an other Word document.
You can select and switch between languages using the Translator tab, which appears on the right. To fully understand each word’s meaning, use the sidebar to highlight it.

8. Beautify Fonts with Kerning
In order to improve the aesthetic appeal, kerning modifies the distance between two separate letters. Each typeface needs a unique kerning when designing a document. When designing with large fonts in Word, such as for an ebook cover, kerneling becomes crucial.
Kerning is disabled by default in Word, and you typically don’t need to worry about it. However, suppose you have a five-page assignment to turn in. Instead of writing unnecessary fluff, widen the spaces between the letters to save time!
Kerning Font by clicking the tiny pop-out arrow (on the Home tab). You can also hit Ctrl + D. Activate the Advanced tab. Put a check in the box next to Kerning for typefaces. Try out different point sizes by typing them in the box. Keep in mind that kerning doesn’t look nice with all typefaces and font sizes.
9. Inspect Your Document with Microsoft Word
Collaboration is a key element of MS Word nowadays, but security must also be considered. You can evaluate and verify the document for any important information to be there as a secret with Word’s Document Inspector.
Some user data is automatically added to a document whenever you create one or even edit one. Before sharing a document, the Document Inspector enables you to remove this kind of content.
On the File tab > Go to Info > and click on Inspect document > Select check for Issues > Inspect Document to open the Document Inspector.
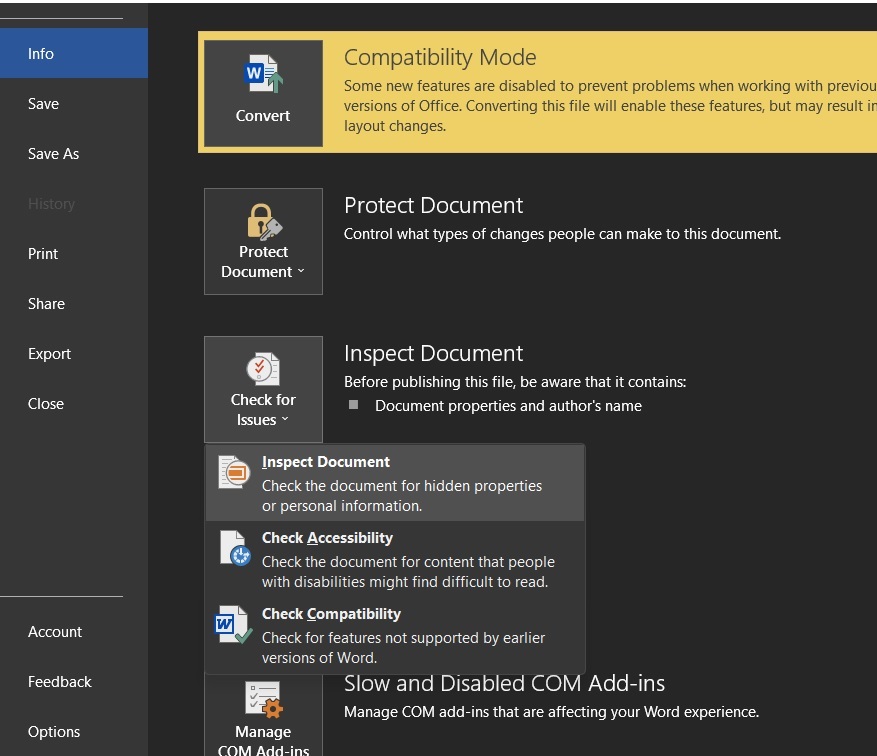
By checking the boxes, you can view concealed material. Any categories that include sensitive data are marked with an exclamation point after inspection. Each category’s Remove All option eliminates the data and completes the document.
10. Use features of Hidden Text
A non-printing character property called Hidden Text has some uses. Text hiding has a variety of applications like:
- Creating a simple quiz using hidden text for answers
- Control the layout for specific printing by inserting hidden texts
- Temporarily hide confidential information that you don’t want others to see.

To hide or unhide text:
- Choose text you wish to hide
- Go to Home > Choose Font Dialog box > Font.
- Select or clear the Hidden checkbox.
To print hidden text:
- On File tab > Go to Options > Select Display.
- Select the Hidden text check box.
- Choose Print hidden text check box
- Click Ok.
Formatting marks, often known as non-printing characters, let you debug and perfect a document’s layout. For instance, if your paragraphs must be spaced with the proper line breaks, your sentences must be single-spaced, all tabs must be lined up, your table cells must be nicely structured, and so forth.
Some of the non-printing features that are useful for managing the layout of a Word document include ravens, tab-markers, spaces, line breaks, and hidden text. Pilcrow button on the Home tab allows to display non-printing characters or eliminate page breaks as desired. You can also press Ctrl + *.
11. How to add timestamp in Ms-word?
When collaborating with the team on a document, adding a timestamp that updates automatically can be beneficial to know when it was last updated by yourself or another team member. You can add the timestamp anywhere in the document.
For this one, we will add it after the title. We will add a parenthesis to stick the timestamp in there.
- Go to the insert tab and right click on “date and time.”
-
You will see various options, select the format that you want to have it automatically update in real time.
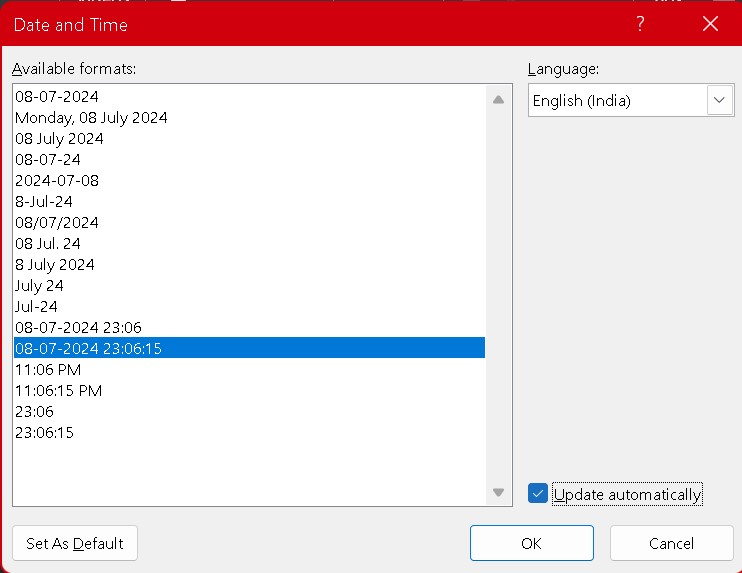
Check the box next to update automatically then click on OK. Now, when yourself or team member updates this document the timestamp will automatically be updated.
12. How to use Smart Lookup?
The smart lookup feature is great for those times when you need to search anything on the internet for information without having to open a separate web browser and leave the document that you are currently working on.
- To use it, highlight or select a word or phrase.
- Right click on the highlighted text and select “search” followed by the word or phrase.
- A new panel will open on the right with definitions or quick explainers along with other resources on the internet to gather additional information.
13. Do Voice dictation in word
Voice dictation is a fantastic feature that has improved so much in word. It is now actually great especially for those with disabilities.
You just need to speak the words and they get typed into the document.
- In the Home tab on the right side of the ribbon, click on dictate and try speaking what you really want to get types in.
All these tips, tricks and hacks save your time by 87% if you often use MS word. The students working to prosper in any field of profession must have a great hands on MS Office as a whole including Word, Powerpoint, and Excel. If you want to stand out in your job, Delhi’s top Computer Institute located in Dwarka Mor is offering a dedicated basic Computer course covering Microsoft Office suite which will enable you to be a more capable candidate in your next job interview.
Checkout all the online and offline course IT for Microsoft Office, Python, Advanced Excel, Tally, Word