To ensure that all data entries are correct and consistent, you might frequently wish to regulate information entry into specific cells when setting up a worksheet for your users. You may want to restrict the number of characters in the text and the maximum number of characters one can type in a cell, among other things. You can even wish to provide a pre-set list of eligible contributions to avoid mistakes.
All this is possible with Excel Data Validation in all versions of Microsoft Excel 365, 2021, 2019, 2016, 20013, 2010 and before.
Data Validation: What is it?
Data Validation lets you set criteria and limitations for entering data into a particular range or cell. It is the process of guaranteeing the precision and worth of data.
Data entry occurs in automated systems with little or no oversight from humans. Thus it’s necessary to ensure that the data being input into the system is accurate and up to par in terms of quality. If the data would not be recorded correctly, it will have limited use and can lead to more serious problems with downstream reporting. Even if unstructured data is submitted correctly, corresponding expenses for cleaning, converting, and storing will still arise.
What is its purpose?
Data validation features have many applications. Below are some common uses:
- Only allow text or numeric values in a cell.
- Only accept digits that fall inside a given range.
- Enable data entries up to a certain length.
- Cap the time and dates outside of a specified range.
- Only allow inputs from the options in a drop-down menu.
- Verify an entry using data from another cell.
- Whenever a user selects a cell, an input message is displayed.
- A warning message is displayed when incorrect data is submitted.
- Invalidate cells and find the wrong entries.
Data Validation In Excel Examples
Whole Number Validation
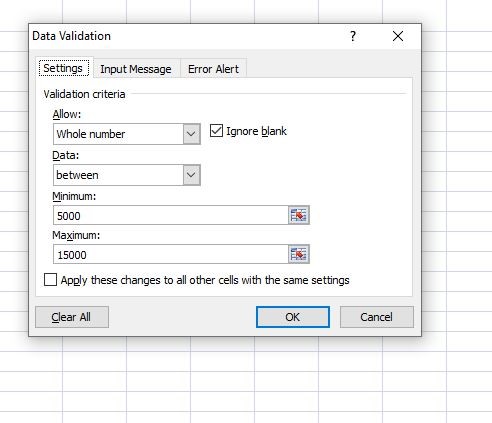
Using data validation, you can mandate that users only enter whole integers in a cell. You can set the minimum and maximum allowable values.
Follow the instructions to set this up:
Step1. Choose the cell or range of cells you wish to apply validation to.
Step2. Choose the Data tab, then select the Data Validation option.
Step3. Choose “Whole Number” from the Allow drop-down menu in the dialogue box that follows.

Even better, you can define a data range with min and max values. You can specify Input Messages and Error Warnings to display.


Decimal Validation
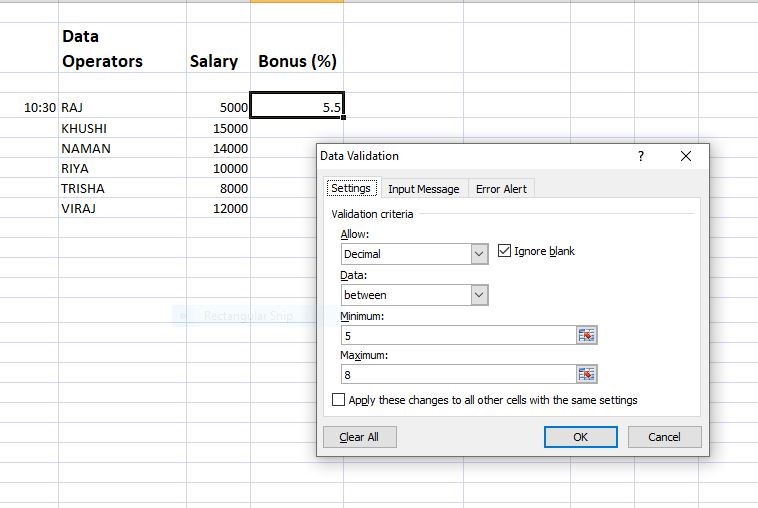
When you need the user to type in a number with a specified number of decimal places, you perform decimal validation. For instance, you may insist that the user provide a monetary figure with two decimal places.
Step1. Choose the cell or range of cells you wish to apply validation to.
Step2. Choose the Data tab, then select the Data Validation option.
Step3. “Decimal”<Range<Max and Min Limits if needed.
It operates like Whole Number Validation. Yet, the main distinction between it and Whole number validation is that it permits decimals within the specified limit whereas Whole Number Validation doesn’t.

List Validation
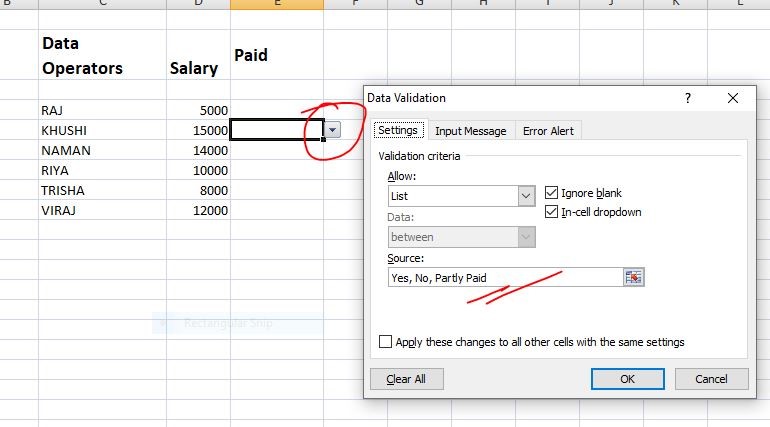
With the help of this kind of data validation, it is made sure that the user chooses a value from a pre-specified list. Either creating the list manually or generating it from a group of cells are acceptable methods.
Step1. Type the List you want. (Optional)
Step2. Choose the cell or range of cells you wish to apply validation to.
Step3. Go to Data Tab < Data Validation < “ List” is the Dialog Box Appeared.
Step4. Create the source by either typing the list directly, separated by commas, or by providing a cell range containing the list.


The bottom right of the validated cell will display a Drop Down Arrow. This button will enable the drop-down list you’ve chosen, allowing you to enter a value for the cell.
Date Validation
When a user inserts a date into a cell, date validation makes sure that the date is appropriate. You can choose the maximum and minimum date values that are permitted.
Step1. Choose the cell or range of cells you wish to apply validation to.
Step2. Go to Data Tab < Data Validation < “Date” is the Dialog Box Appeared. Step3. Specify if you want dates that fall within a range, an exact date, or a date that is earlier or later

Time Validation
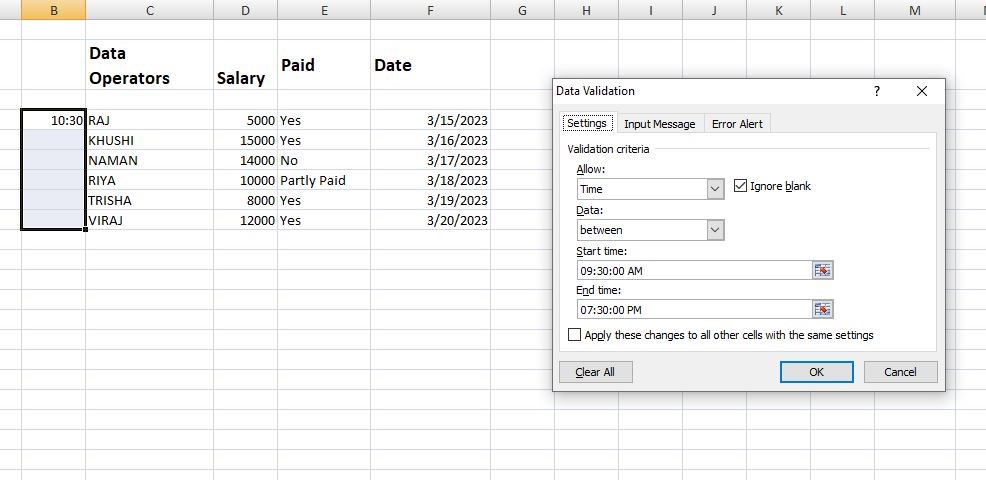
When a user inputs a time into a cell, time validation makes sure it is accurate. The minimal and maximum time intervals that are permitted can be specified.
Step1. Choose the cell or range of cells you wish to apply validation to.
Step2. Go to Data Tab < Data Validation < “Time” is the Dialog Box Appeared.
Step3. Specify if you want a time that falls within a range, an exact time, or a time that is earlier or later.

Text Length Validation
This kind of data validation makes the user provides a text string that is the right length or falls within a predetermined range of lengths. For instance, you could wish to limit the number of characters in a password field to a maximum of 8.
Step1. Choose the cell or range of cells you wish to apply validation to.
Step2. Go to Data Tab < Data Validation < “Text Length” is the Dialog Box Appeared.
Step3. Specify if you want the text length that falls within a range, en exact length etc

Custom Validation
You can define your own data validations based on certain criteria using custom validation. For instance, you might design a unique validation rule to make sure the user inputs a value larger than the value of the cell next to it.
Even if you want to ensure that every entry in a range or cell is distinct, you may select “Custom” and then specify the formula.
Step1. Choose the cell or range of cells you wish to apply validation to.
Step2. Go to Data Tab < Data Validation < “Custom” is the Dialog Box Appeared.

The Wrap Up
These are just a few instances of how Excel can be executed to validate data. There are countless options. You can make sure that your data is correct, consistent, and error-free by using data validation.
Pivot tables in Excel is another interesting topic you must learn it to save time managing data. Here is the link to Pivot table in Excel
Learn Microsoft Excel with avdance excel course in Delhi or learn excel online

