This is the second article to our Photoshop tutorial series, in first article we discussed an introduction to Photoshop tools. In this article, we will learn how to use it as a first-time user to edit any image.
Photoshop is the most advanced and comprehensive photo editing program out there. It will let you do everything from basic adjustments all the ways up to advanced compositing and retouching and that is why you must try this out once. In this age, as you all guys know Photoshop is a very valuable skill that set because of all the attention on social media, content creation, building your own personal brand or anything along those lines. There are no restrictions to your creativity while using Photoshop.
So we are starting off with our tour let’s jump into it and just stick long to it guys.
- Install the application on your PC.
- To finish the installation, adhere to the instructions displayed on screen.
- If you already have an account, you can proceed; if not, click the sign up button to get started.
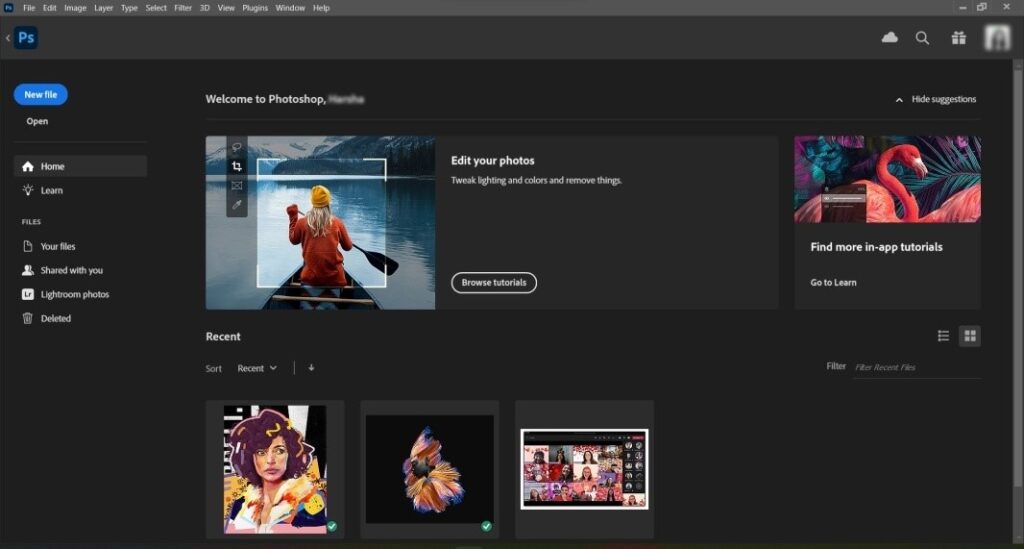
- When Photoshop is opened, a page with helpful hints appears on the home screen.
What is Photoshop for?
In essence, you’ll have one that is solely focused on manipulating certain pixels. Therefore, what you’re actually attempting to do is photo editing, image manipulation in particular areas, and vector graphic design for visual illustrations.
Let’s explore Photoshop raw capabilities.
Open a new document
So first thing you need to know, if you want to get started you have to
- Click on create new and then you can set the name, resolution and orientation of the document.
- You can choose the template accordingly.
Importing a picture:
- Open up the space where you have stored your picture.
- Drag and drop it right to the created document.
All distinct tools are set up by Photoshop right here on the left. You will likely utilize a few of them to edit and manipulate your photos the most.
- If you can’t find a tool on this bar, simply do the following:
- Toggle any tool on or off by going to the window at the top of the screen.
Now let’s dive into some of the basic editing tools.

Crop and straighten Image
This tool actually works if you are scanning a single image or a bunch of images or photographing then this trick is for you.
You only have to do instead of having to go to the crop tool and crop it one by one; you don’t have to get into this mess.
This time let’s try something new.

- Go to file in the top left corner of the screen.
- Select the automate option.
- Inside automate, have a look at crop and straighten photos.
- Photoshop will do it automatically for you; it will create different versions for each photo. This will work no matter how many photos you have in just one scene.

Improve lighting and color
Let’s look at how to use adjustment layers to enhance the lighting and color in your photos. We’re going to make some tweaks to this image using various effects and layers. These unique layers instruct Photoshop to make the adjustment on a different layer entirely. This gives you the most editing flexibility while also protecting the original photo.

- So, first thing to do is add an adjustment layer to add some punch
- Choose brightness contrast by clicking the half-black, half-white circle at the base of your layers panel.
- In the layers panel, a new adjustment layer is active.

- Try clicking the auto button in the properties panel to have Photoshop automatically correct the image, and then tweak the sliders to your preference.
- In the properties panel, click the visibility symbol to view the before and after adjustments.
- If the image becomes darker, you can also utilize the opacity option at the top of the layer panel.
- You can also apply a hue-saturation adjustment layer.
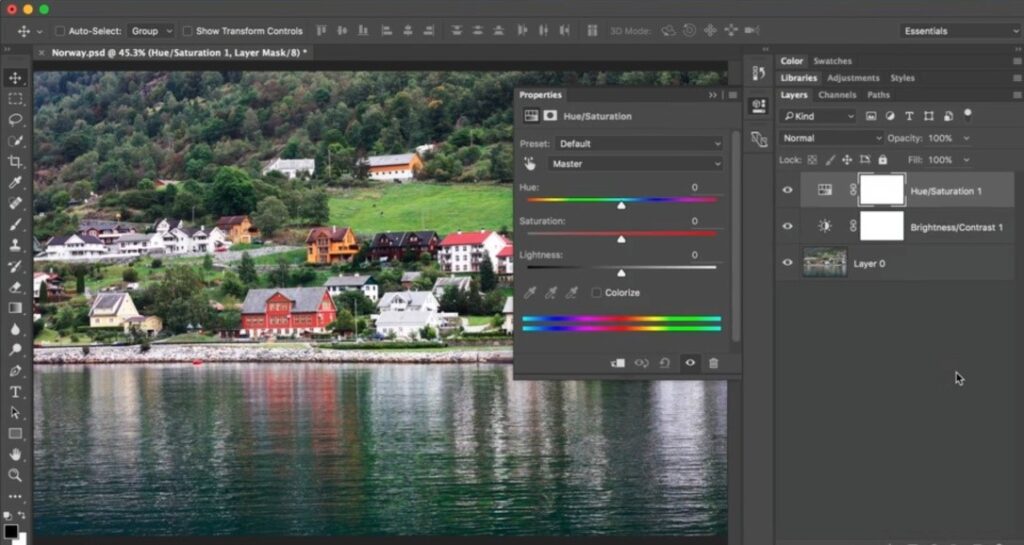
- You can also hide some of the adjustment from areas using a layer mask. You are going to notice a white color cube in front of the layer which lets us know that the adjustments we made are visible and by adding black to the mask the adjustments will be hidden in those areas.
- From the tools panel, select the brush tools. Select a soft edge brush by clicking the brush preset selector in the settings bar.
- Set the brush’s tip size using the size slider.
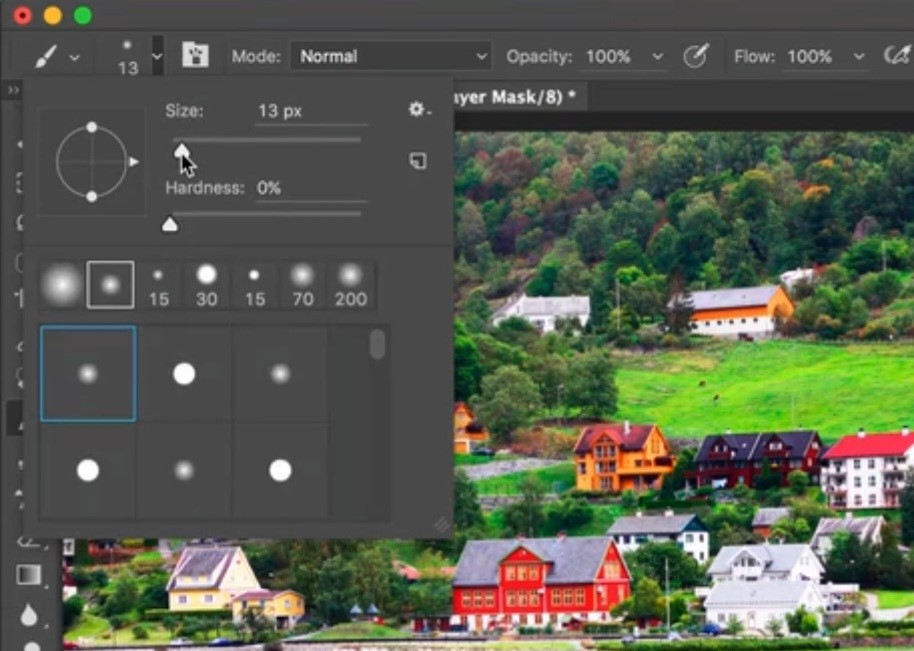
- Look at the foreground color swatches in the color cube at the bottom of your tool panel to see what color the brush tool will use.
- When a layer mask is enabled, your options are limited to white, black, or grey.
- By moving the black brush, will hide adjustments of the area.
- When you are finished editing, select Save Document from the File menu.
Remove unwanted content in photoshop
Unwanted objects in a shot can be eliminated using the spot healing brush and patch tools. Both programs work incredibly well for photo retouching.
In Photoshop, the spot healing brush is conveniently located on the left side; simply press J to access it. Let’s examine this in more detail to see how it functions without causing harm.
- Preferably, try to do this is on an empty layer.
- To duplicate the layer command (ctrl + J).
- In order to work on this empty layer, just make sure that the sample option on the top here is set at (current below).
- In the tools panel, activate the spot healing brush and make sure that in options bar, content aware button is highlighted.
- Go to your image and adjust the size of the brush according to the object you want to remove.
- You can use right bracket key to increase brush size and left bracket key to decrease it.
- Put the cursor on the object you want to remove and click. You can also drag the cursor to remove distracting objects.

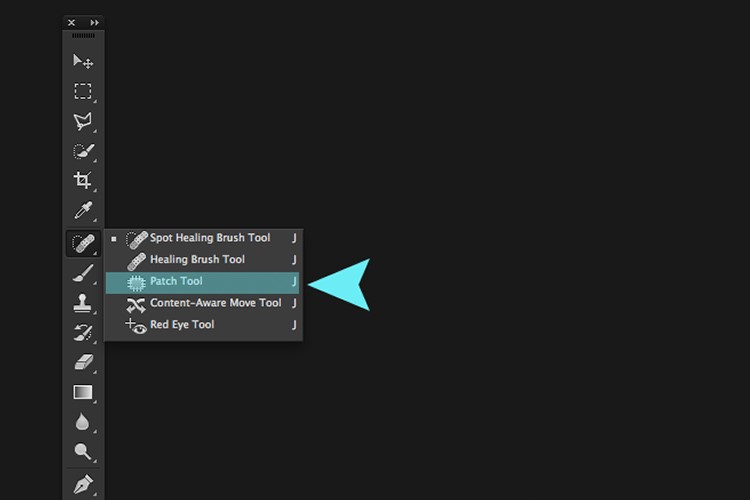
Patch tool
- Now to remove larger items, you can take advantage from patch tool in Photoshop.
- Let’s try by creating a new empty layer.
- In the tools panel, click and hold your mouse on spot healing brush,
- A menu bar appears.
- Select the patch tool to continue your editing.
- In the option bar make sure that in options bar, content aware button is highlighted and then turn on sample all layers.
- Now, click and drag to draw a rough selection around the item you want to remove. Be sure that the selection is slightly larger than the item itself.
- When you release your mouse button, Photoshop performs the patch and blends it with surrounding pixels.
- To perform more color blending between the two areas, increase the color slider.
- To perform less color blending decrease it.
- Being satisfied with your editing, deactivate the selection.
- Go to the select option and inside it have a click on deselect.
- Now choose view and fit your image to the screen and assess the removals by turning off the visibility of the layers.
- Save you document from the file menu on the top of screen.
Sharpen your image and save
The last and most comprehensive editing stage is this one. Here, you must emphasize edges. In a digital image, it refers to the region of strong contrasts where very dissimilar pixels converge.
Photoshop brightens the light pixels and darkens the dark pixels to draw attention to certain edges.

Let’s try the same.
- Here we will use the smart sharpen filter because it’s quick and easy to use.
- Firstly, just prepare your layers as you did before.
- Go and choose the filter option from the top.
- Inside the filter button, go to the sharpen tool and then smart sharpen to do it quickly.
- A dialogue box will appear and you will there see a preview of the image.

- On the left of the preview, you will see sliders to adjust sharpening of an image.
- Use the zoom tool beneath the image preview to set your document zoom level to 100% so you can sharpen it accurately.
- Set the preset menu to default and then adjust the sliders to your liking.
- Radius slider will sharpen the image width, the higher the number the more obvious the sharpening. For the best results keep this setting low.
- Drag the amount slider slowly leftward till the sharpening looks good to you.
- If you see any speckled flakes appear in this image, drag the reduce noise slider to the right to get rid of them.
- When everything looks good click “ok” And that’s how Photoshop sharpened your image.
- Don’t forget to save your image in Photoshop format.
- That’s how you are done with the editing.
Wrapping up
And that’s all there is to it! You can now feel free to experiment with different effects to see what you like best. Just remember: the more airbrushing or other editing you do, the more time-consuming it will be. So if you’re just starting out, try to keep things simple!
Do you really want to become a pro in photoshop? Enroll in the top Photoshop Course in Hindi created by best graphic design institute in Delhi. You can also join the offline photoshop course in Dwarka